Page History
| Info | ||
|---|---|---|
| ||
There are two different ways to create custom application that may be used within EPISODES Platform. The first option is to use the Platform's dedicated wizard which suggests required elements and parameters to fill in the created application. The second option (recommended only for advanced users) is to create a Git repository using only the Application Workbench and then create and add required files by hand. |
Contents of this guide
With this guide you will learn how to create your own application that could be later used within the EPISODES Platform. Depending on your choice, you can create the application using automated tools provided by the Platform (recommended) or you can create it manually, by first, creating a repository and then adding the required files. This guide will also tell you how to check whether the application was created correctly. To learn how to edit the application files after it is created, please check this guide.
| Anchor | ||||
|---|---|---|---|---|
|
The dedicated wizard offered by the EPISODES Platform will allow you to create a new application using some pre-set values and to generate all the files required for connecting an application to the EPISODES Platform in a correct form - the descriptor files will be generated using the values you choose, along with a stub of the application code matching the descriptor. Note, that we recommend using the wizard even if you already have a good knowledge of GIT and Application Workbench, as, in this way, we can ensure the application's repository contains all required files and that they are correct in relation to one another. The manual repository creation is recommended only in case you already have your code in a local GIT repository and want to connect it to the Application Workbench (and, ultimately, to EPISODES Platform).
To create a new application using the wizard, log in to the EPISODES Platform and go to My Apps tab (note, that it will not be visible before logging in to your account). Once there, use the Create New Application button (Figure 1) to open the wizard (Figure 3).
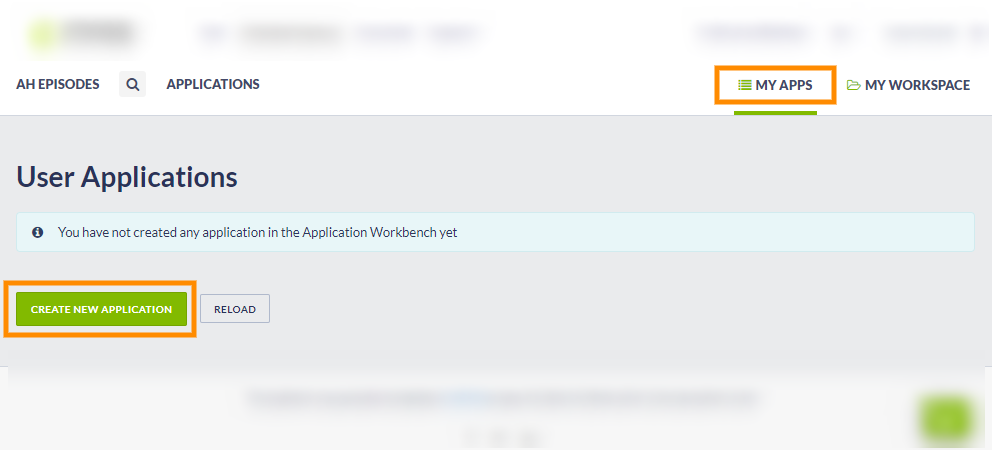
Figure 1. User apps tab in EPISODES Platform with Create new application button marked
Note, that if you do not see the Create new application button, and instead of the blue information panel, you have a red or yellow error message as shown on Figure 2, your Application Workbench account is not configured correctly. Use the Creating Application Workbench account, to check if you completed all required actions.


Figure 2. Messages displayed when the Application Workbench account is not properly configured
Once you choose to create a new application, a configuration page will be displayed (Figure 3). The panel on the left (marked with (1) in Figure 3) contains forms for filling the fields that will be used to construct the Application Description file and the stub of the main execution script compatible with it. A brief description of each field can be found when hovering over the information (i) icon next to it, and a detailed description can be found in the Application Description file guide. For the multiple input fields, the Add buttons and trash icons next to them are used to add or, respectively, remove values (see also a filled form in Figure 4). The Add application description box (marked with (2) in Figure 3) toggles displaying a form for specifying the Application Description (see Figure 5). After all the values are filled, use the Create button (within controls marked with (3) in Figure 3) to trigger the creation of application. If the process is successful, you will come back to the initial User apps view (Figure 1), but the the new application should be visible on the list of applications under the name you specified as Application repository name. See also this section to see how to check if the application was created correctly. Note, that one of the reasons of failure when creating the application could be using a name of an application that already exists as the Application repository name. The name of the new application has to be unique among your all applications.
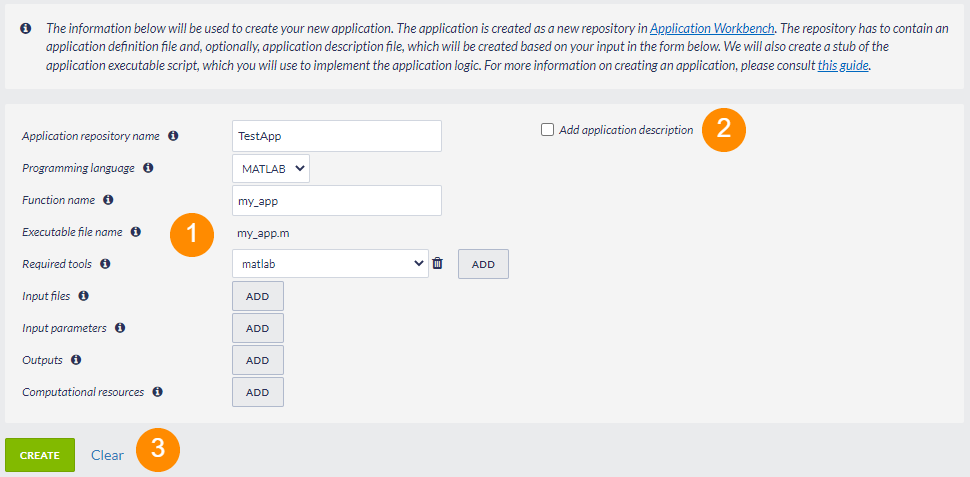
Figure 3. View of the new application wizard, with most important elements marked
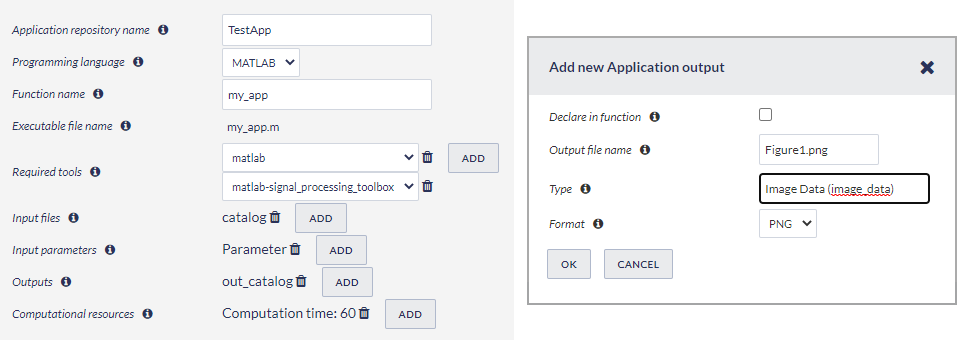
Figure 4. Left: application definition form filled with values; Right: a sample dialog window used for collecting application input information
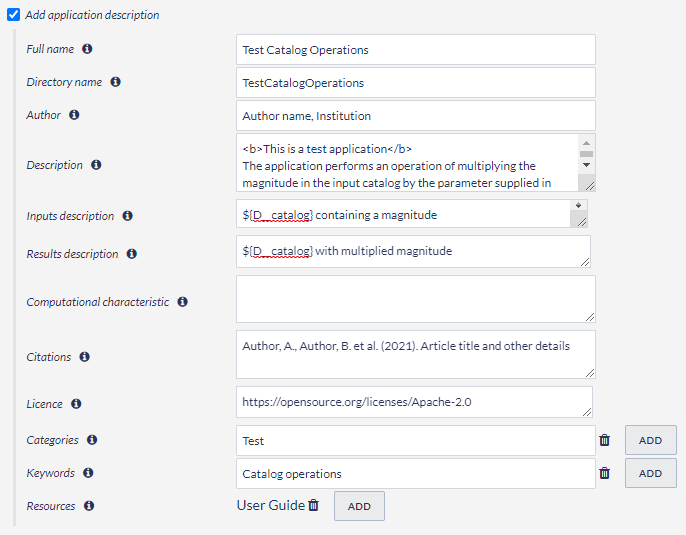
Figure 5. Application description form filled with values
In case of any uncertainty as to the meaning of any of the form fields, please consult the Application Description file guide and Application Description file guide.
| Anchor | ||||
|---|---|---|---|---|
|
When creating the new application manually, you will first have to create the repository for the application code (using one of the options specified in the subsequent subsections), and then, configure it, so that it could be recognized by the EPISODES Platform - i.e. you will have to adjust the repository contents as specified in Custom application configuration guide. To add new files or edit the existing ones, please use the Editing the application code guide.
The repository has to be created from the Application Workbench, after logging in to it (check this guide if you do not have an account yet or have any trouble logging in). To do this, use either the menu in top right corner and the New Repository option or the + icon next to the Repositories list (both options marked in Figure 6).
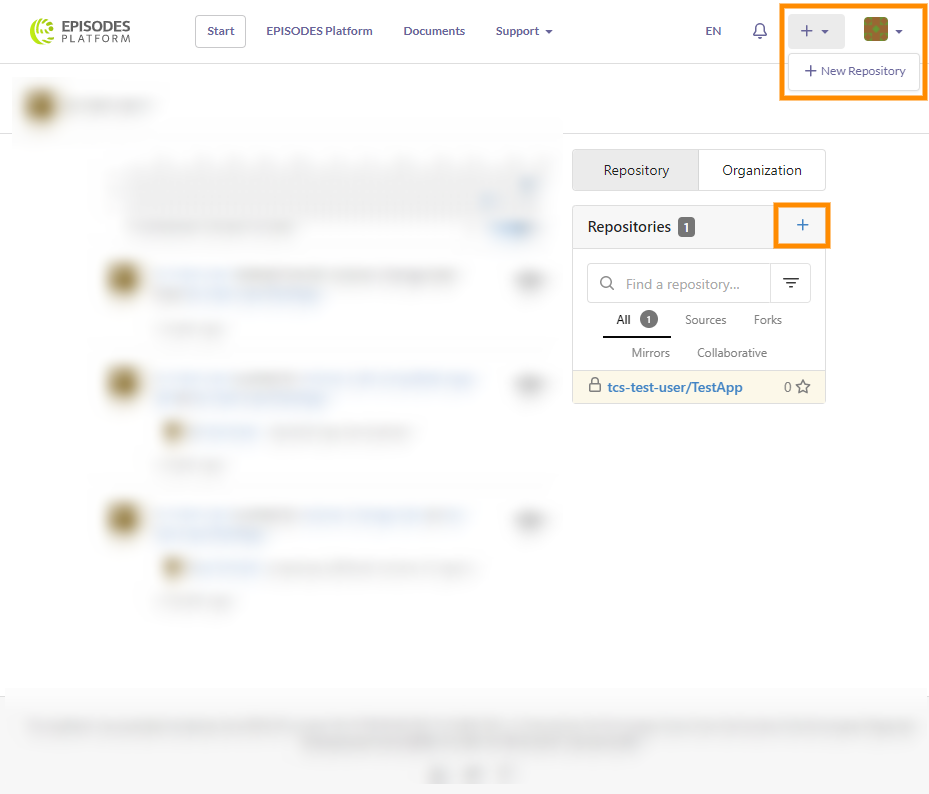
Figure 6. Main view of the Application Workbench with controls that can be used for creating a new repository marked
Using any of the new repository creation options, will result in displaying a page as shown in Figure 7. The most important elements to fill here are (also marked with numbers 1-3 in Figure 7):
- Repository Name (required) - the name of the repository, that will also be used as the application name. It has to be unique among your all repositories (whether created with the EPISODES Platform wizard or manually) and may contain only alphanumeric, dash, underscore and dot characters.
- Visibility - it is strongly recommended to mark the repository as private (check the box Make Repository Private). Otherwise, the repository, and thus, the application will be visible to everyone and appear on the applications list for every user. Note, that even for the private repositories, it is still possible to share the code with other (selected) users.
- Description - short description what the repository is containing.
- Initialize Repository - if this field is checked, the repository will be already initialized and some initial files will be added (a
README.mdfile and a license, if you chose it) to it upon creation. This initialization will allow you to start working with the repository right away, otherwise, you will have to initialize it from your computer (see Figure 9). Do not check this field if you already have a local GIT repository and only want to publish it to the Application Workbench.
Other fields may be left empty, but if you already have an experience with systems based on GIT, such as Github or Gitea, configure the repository here to your convenience.
After filling the values use the Create Repository button (marked with (4) in Figure 7) to proceed with creating the repository.

Figure 7. View of the new application's repository creation with most important elements marked
If you checked the Initialize Repository (marked with (3) in Figure 7), upon choosing the Create Repository you will be taken to the main directory view of the new repository (Figure 8). At this point, you will be able to start Editing the application code to configure the application correctly.
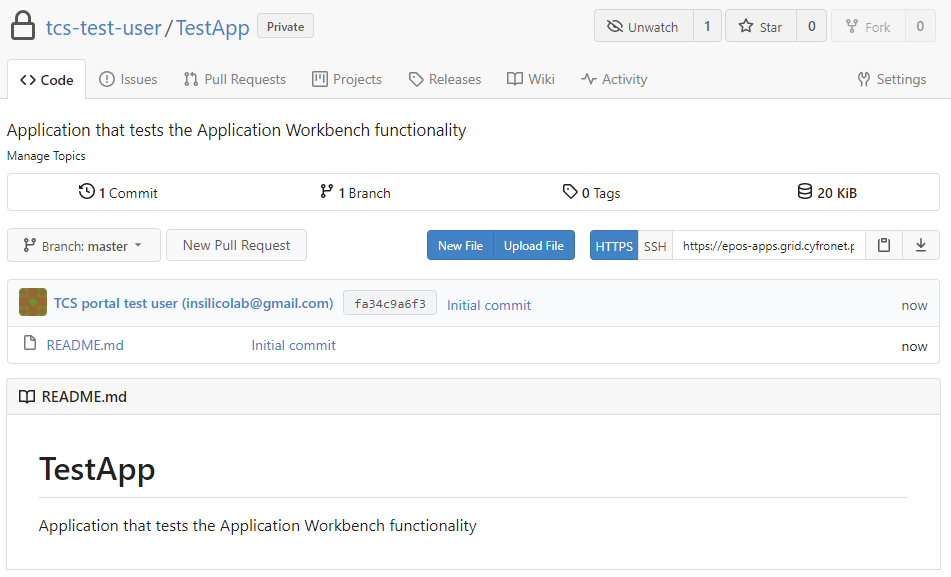
Figure 8. Main view of the new repository
If you did not check the box next to Initialize Repository (marked with (3) in Figure 7), you will be now presented with an information page on how to initialize the repository on your own (Figure 9). This option should especially be used, when you already have a local GIT repository with your application code, but may also be followed in other cases.
![]()
Figure 9. Information page containing instructions for initializing the created repository
Anchor GitInit GitInit
Using an existing local repository
| GitInit | |
| GitInit |
If you already have your application files in an initialized GIT repository, you have to create the remote repository in Application Workbench following the previous instructions, but remembering to leave the field Initialize Repository (marked with (3) in Figure 7) unchecked. Once the repository is created, follow the instructions displayed on the information page under Pushing an existing repository from the command line (see Figure 9) - i.e. invoke the following commands:
| Code Block | ||
|---|---|---|
| ||
git remote add origin <repository_url> git push -u origin master |
Note, that for this mode of initializing the repository, you will have to have the GIT client installed on your computer (see also this guide).
Migrating from an existing code repository
The Application Workbench allows you also to copy an existing repository you have on a different GIT server. To do this, use the link Migrate repository on the new repository creation page (Figure 7, the link is marked with (5)) or follow the direct link: https://epos-apps.grid.cyfronet.pl/repo/migrate.
| Anchor | ||||
|---|---|---|---|---|
|
The easiest way to check the correctness of the application is to verify it from the EPISODES Platform. Once, your application is created, you will be able to see it under User applications in My Apps Management tab (Figure 10 , - note that this is the same view as in Figure 1, but now you should have an application listed). Note, that if you created the repository otherwise than with the EPISODES Platform wizard, using the Reload button might be necessary to refresh the list. Validating the application configuration might be also useful in such case (see more in Custom application configuration guide). To edit the application configuration similarly to EPISODES Platform wizard, use the Edit descriptors button.

Figure 10. The new application visible on the My Apps Management view within EPISODES Platform
Checking the My Apps list is only the first step, to check your application, as it only verifies if the repository is present - the files contained in the repository can still be configured improperly and, thus, prevent the application from being read properly by the EPISODES Platform. Therefore, the next step should be to check if the new application is visible on the list displayed If the application was configured correctly, it should now be visible also on the list under the Applications tab (see also this guideFigure 11). If it is not, this means that the Application Definition, and, if existing, the Application Description files are created properly. Nowmight mean, that there is something wrong with either its Application Definition or Application Description file - consider validating the application and checking the Common Issues guide. Otherwise, the final step of verification would be is to run your application.

Figure 11. Application displayed correctly under the Applications tab
Related Documents
| Content by Label | ||||||||||||||||||
|---|---|---|---|---|---|---|---|---|---|---|---|---|---|---|---|---|---|---|
|
Overview
Content Tools