Page History
| Anchor | ||||
|---|---|---|---|---|
|
| Info |
|---|
Tool This document contains instructions for running application Seismogram picking tool within the EPISODES Platform. The application is a tool for picking phases or points on seismograms contained in a SEED file. The picks are saved into a a QuakeML file file and can be used later in other applications (e.g. Source and Shaking Parameter Estimation applications). To obtain more general information about working with applications within the Platform, see Applications Quick Start Guide. |
CATEGORY Source and Shaking Parameters EstimationCATEGORY Seismogram Analysis Tools
KEYWORDS Waveform viewing, Picking on waveform, Format conversion
CITATION Please acknowledge use of this application in your work:
IS-EPOS. (2019). Data Handling Applications [Web applications]. Retrieved from https://tcs.ah-epos.eu/If you use the results or visualizations retrieved from this application in a publication, then you must cite the data source as follows:
Orlecka-Sikora, B., Lasocki, S., Kocot, J. et al. (2020) An open data infrastructure for the study of anthropogenic hazards linked to georesource exploitation., Sci Data 7, 89, doi: 10.1038/s41597-020-0429-3.
Note
Although this guide describes specifically the Seismogram picking tool application, the mechanism of picking (filling the form values) is similar for all applications that require phase or point picking on a seismogram, namely, several applications from the Source and Shaking Parameters Estimation category.
Input file specification
The application requires one SEED (full SEED) or miniSEED waveform file.

Figure 1. Application input file specification
Filling form values
The application form contains the seismograms specified in the SEED or miniSEED file with tools to mark points or phases on them. In case of full SEED files used as input, the form contains also a map with stations information (marked with (1) in Figure 2) included in the file (this information is not available for miniSEED files). The form allows either for manual picking on each of the seismograms or for loading ready picks data from file (marked with (3) in Figure 2). The number of picks required for the application along with current number of picked elements is displayed above the seismograms (marked with (2) in Figure 2). The form allows also for selecting a group of channel components (usually E / N / Z) and zooming all seismograms (with X or Y axis zoom) - marked with (4) and (5), respectively, in Figure 2. Note also, that with files that contain many seismograms, only some of them are loaded at the beginning, others have to be shown with the Show more button (marked with (7) in Figure 2).
To show details of a single seismogram and to perform manual picking on it, expand it by clicking on a chosen trace (traces list is marked with (6) in Figure 2). Sample view of an expanded seismogram is shown in Figure 3.
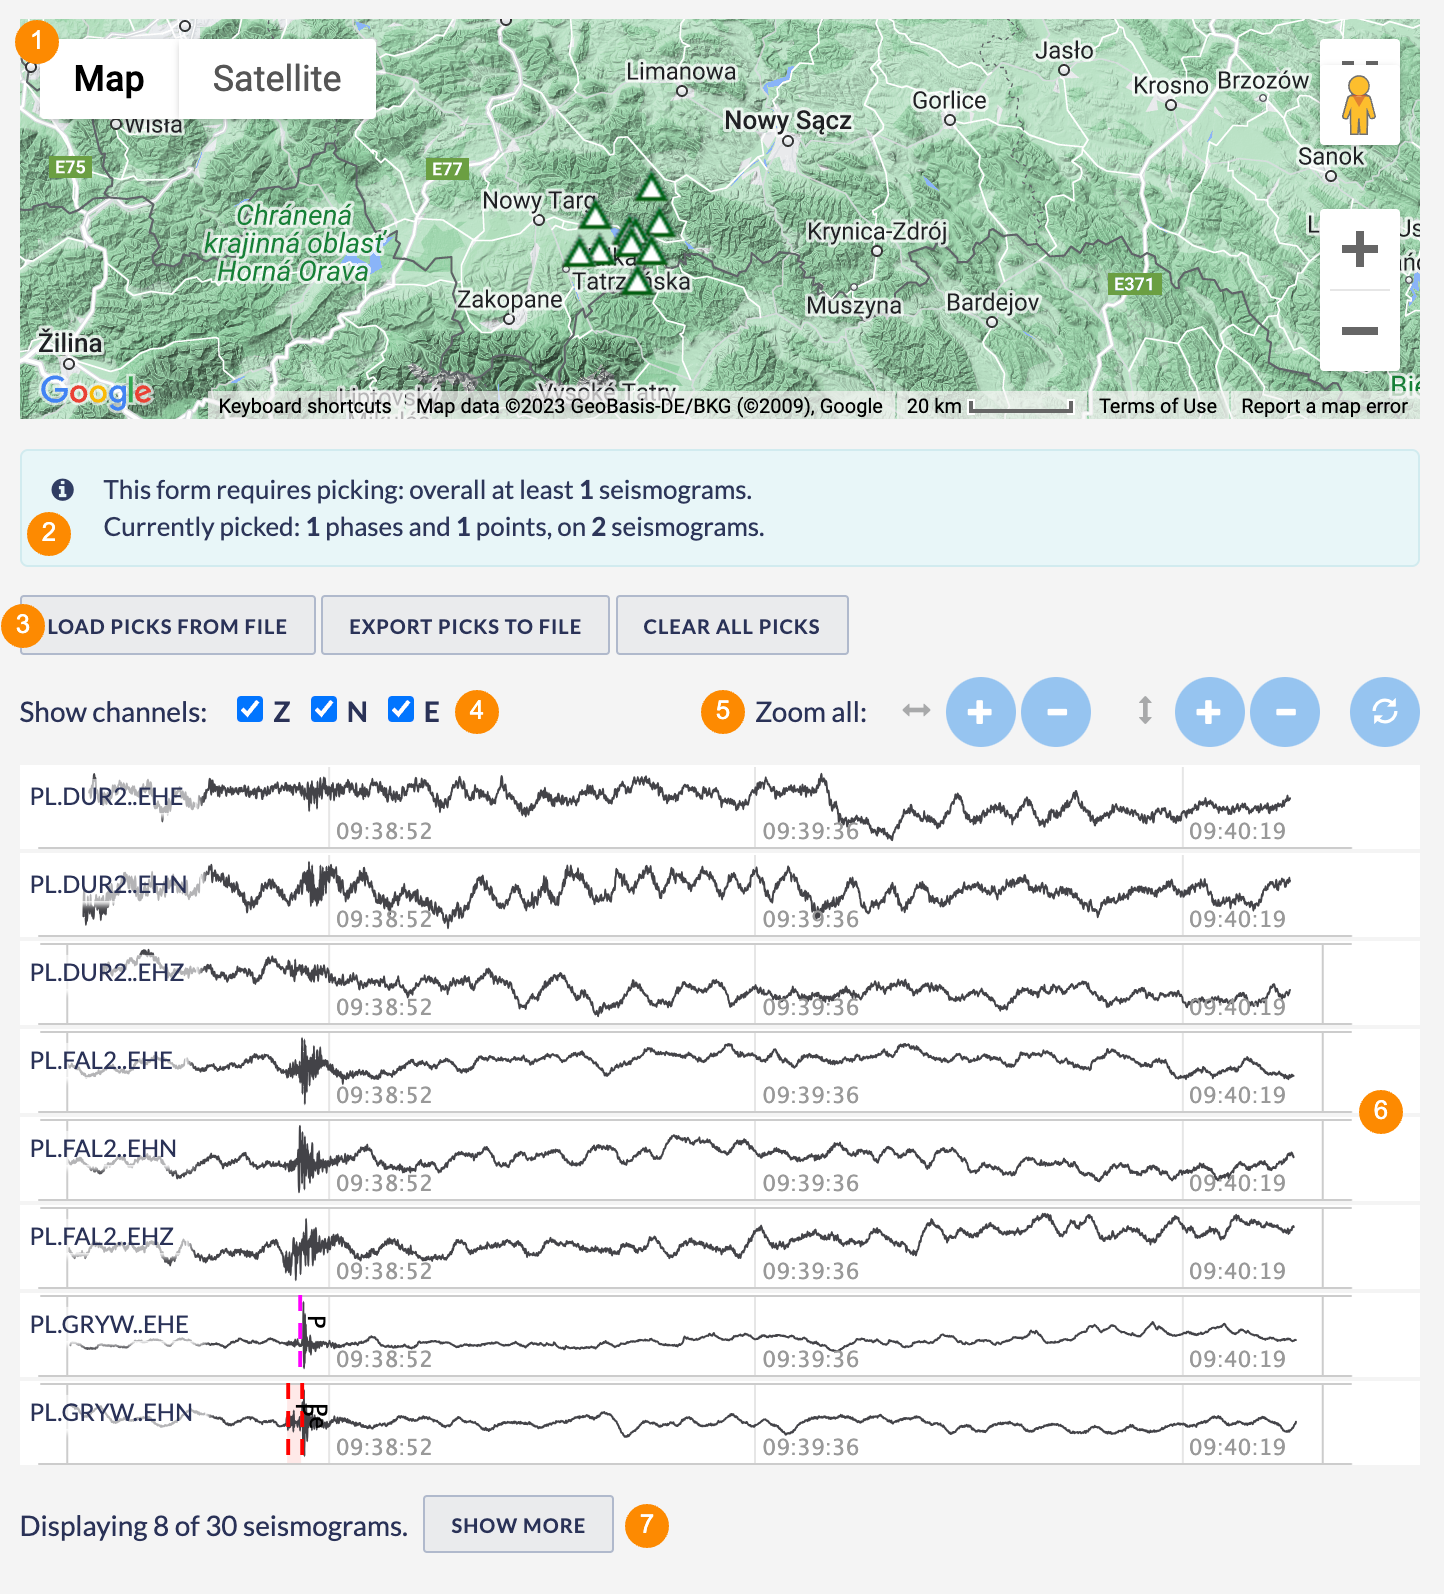
Figure 2. Application form with most important elements marked
Manual picking
| Anchor | ||||
|---|---|---|---|---|
|
Each seismogram is displayed with the name and properties (marked with (1) in Figure 3). To pick a phase or point, choose the respective value (point / phase) from the dropdown list and the pick name (controls marked with (2) in Figure 3). It is also possible apply the baseline correction to the seismogram or to calculate spectrum and, in case of accelerograms, Arias Intensity (controls marked with (3) in Figure 3). Note, that the latter properties are calculated only for the part of the trace that is currently visible (check the zoom navigator - marked with (5) in Figure 3). In some cases the data range is too large to make the calculation, in such event, zoom in the plot until the calculation is possible. Zooming can be done either with zoom controls (marked with (4) in Figure 3) or with the plot navigator (marked with (5) in Figure 3). To add a pick, click on the chosen place of the seismogram plot. There may be only one pick of a chosen type and name on the seismogram - therefore, in case of a point pick type, subsequent clicks on the plot will move the pick point. In case of a phase, subsequent clicking will move either the beginning or the end of the phase to the newly clicked position. Afterwards you can add a new pick of a different type or name (see Figure 4). To remove the pick, use the X icon from the picking controls (marked with (2) in Figure 3).
All the added picks are visible on the seismograms summary (marked with (6) in Figure 2) and their numbers are summarized in the information marked with (2) in Figure 2.
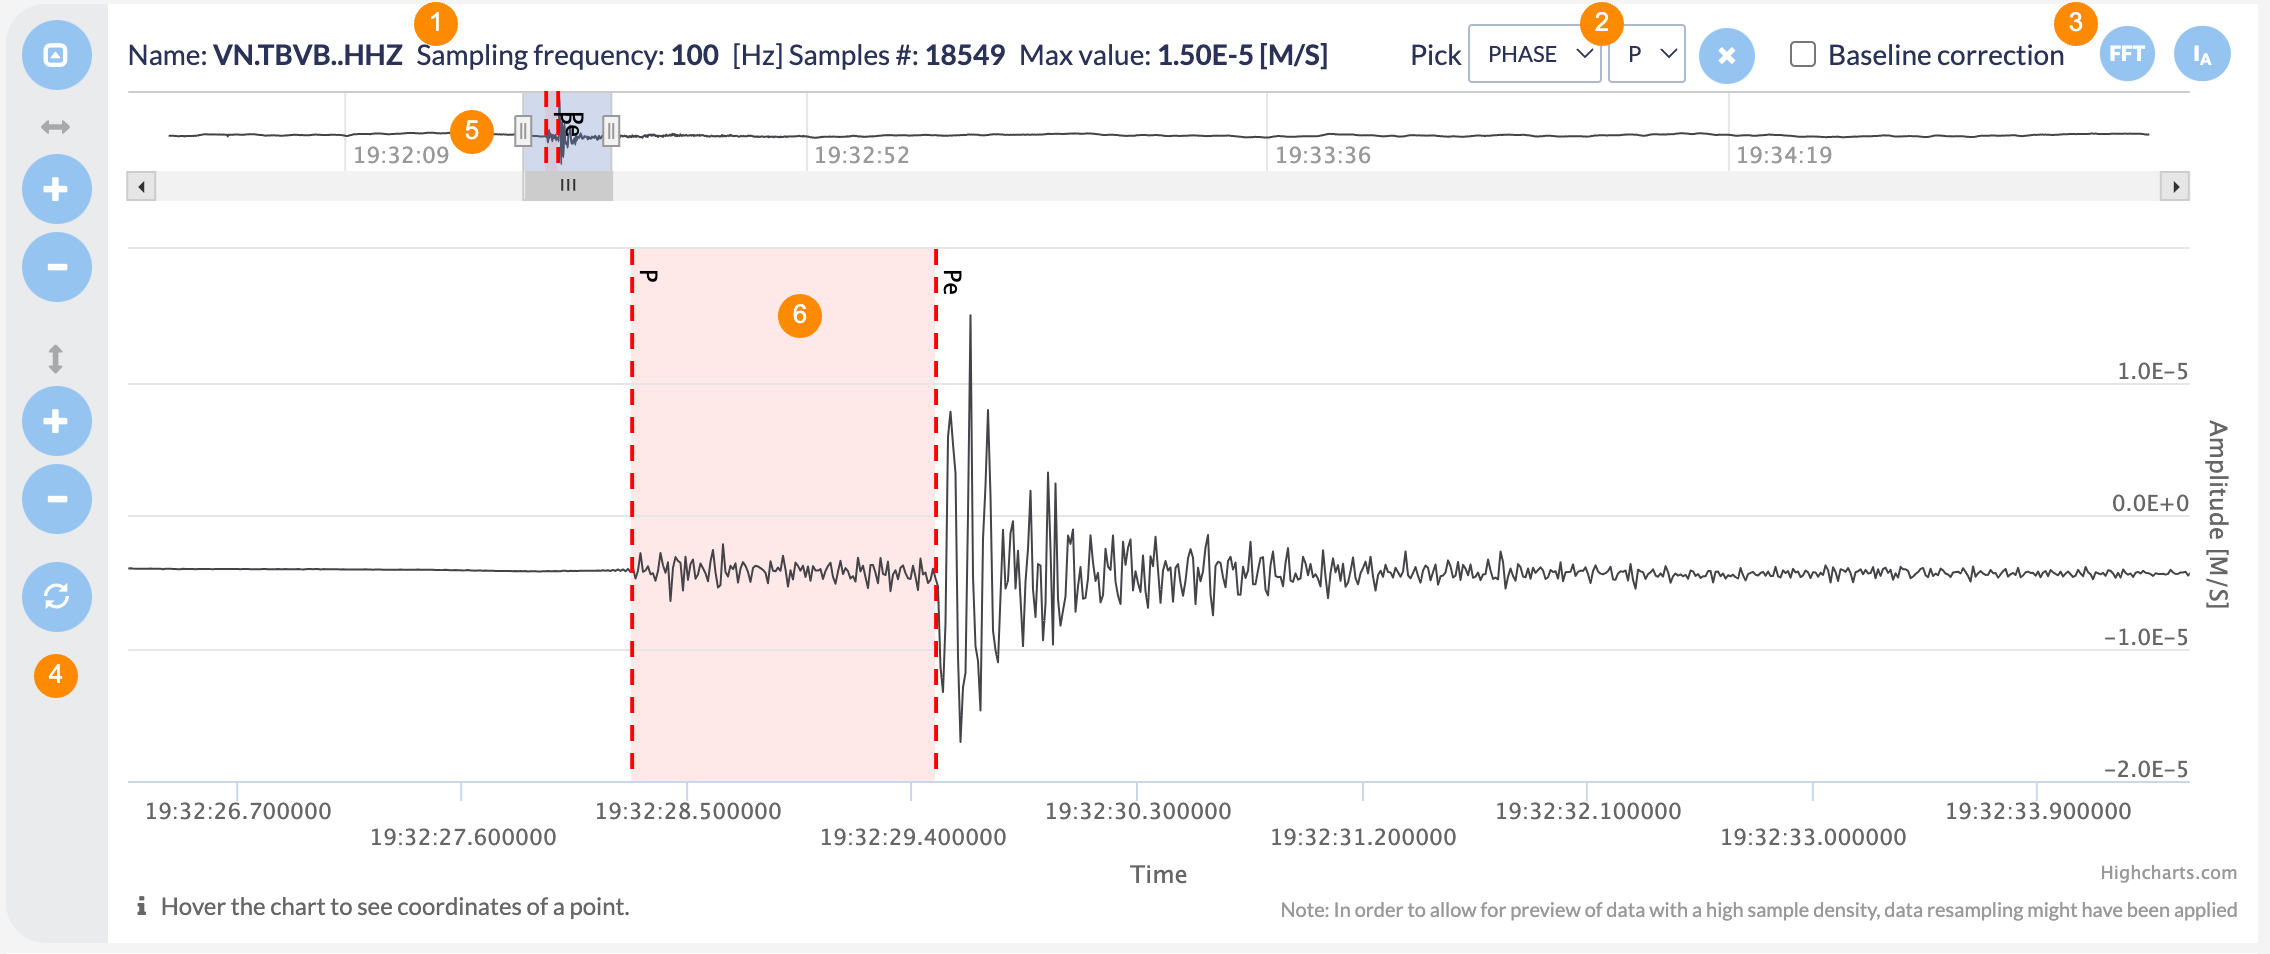
Figure 3. Expanded seismogram with picking tools and phase 'P' marked

Figure 4. Seismogram with phase 'P' and point 'E' marked
Importing picks from file
| Anchor | ||||
|---|---|---|---|---|
|
Instead of manual picking, you can also import the picks from a ready QuakeML file. For this purpose use the Load picks from file button (marked with (3) in Figure 2) and choose the file containing picks. Note, that the file has to be in correct format (defined by the QuakeML specification) and has to contain picks compatible both with the input seismogram and the pick types required by the application (e.g. an application requiring only picked phases will not load the points from the saved file). In case some of the picks from file cannot be used a warning as in Figure 5 is displayed.
 Figure 5. Incompatible picks warning
The imported picks may be later changed or complemented by manual picking.
Produced output
The result file will be saved in a file named quakeml_seismogram_picks.xml in the QuakeML format and visualized within the application outputs. The file can later be used to fill the form of another waveform-based application, e.g. Mechanism: Full Moment Tensor, Localization or other applications from the Source and Shaking Parameters Estimation category (see the Importing picks from file section).
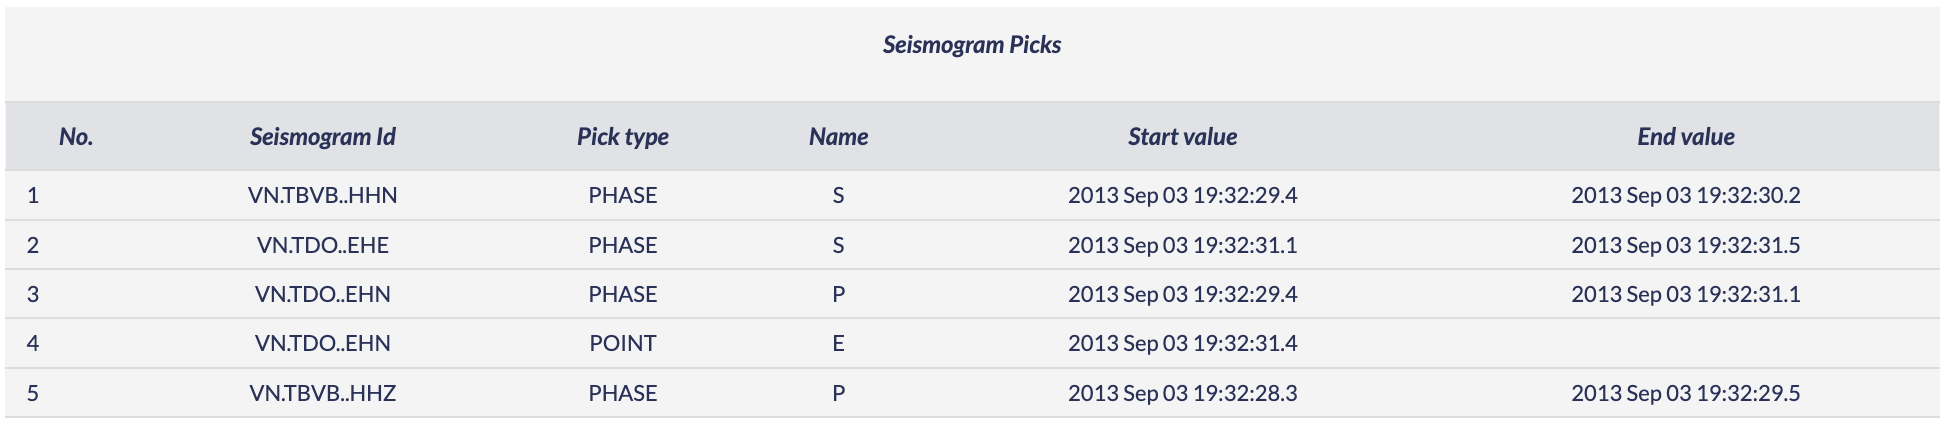
Figure 6. Result file visualization
Step by Step
Thanks to the Seismogram picking tool, the User may observe, interact and elaborate waveforms corresponding to signals recorded by seismic stations and perform various actions such as phase determination and point picking. These pickings are saved by the system and can be further used in waveform-based applications such as 'Spectral Analysis', 'Source Localization' and 'Moment Tensor Inversion'. The application takes as input seed files and enables picking on any number of contained traces. The main part of the application interface is displayed in Figure 1 (additional options appear when clicking on the miniature of the waveform) and described below:
- The user selects the component(s) that he/she wishes to be displayed in the screen. East-West, North-South, Vertical.
- Horizontal zooming in-out.
- Vertical zooming in-out.
- Undo all zooming.
- Select between phase (start and end point) picking and single point picking.
- Only P-wave is enabled in this Application (In other Applications, selection between P-wave and S-wave picking are possible, see "Waveform viewer guide" in "Visualization" chapter).
- Undo picking.
- Horizontal zooming tool. The User may alternatively zoom in-out the waveform by clicking on this small vertical bar and move the mouse left-right. The User may also click and drag the selected (shaded) part of the waveform left and right.
- Collapse the details of the waveform.
- Move the selected (zoomed) part of the waveform left-right.
Figure 1. Snapshot from the use of the "Seismogram picking tool" application.
Picking Phases
The User has to pick a starting and an ending point from the Vertical component of a station (**Z channel - see Figure 2). Then, he/she has to repeat this picking for the other stations.Figure 2. Phase picking demonstration for S (upper frame) and P (lower frame) waves.
The number of picked phases are counted by the system. Once the picks have been chosen, the User may proceed to further analysis by clicking the green "Run".
The output of the application is an XML file ('picks.xml') in QuakeML format, and which can be used for any Waveform-based application (i.e. 'Moment Tensor Inversion', 'Earthquake Spectra', 'Source Location').
As an optional action, the user can select the seismic events from the seismic catalog as second input to visualize it along with the stations taken from SEED file on the map presented in Figure 1.Related Documents
| Content by Label | ||||||||||||||||
|---|---|---|---|---|---|---|---|---|---|---|---|---|---|---|---|---|
|
|
|
Overview
Content Tools