This application performs moment tensor inversion and determines the focal mechanisms of seismic events using the P-wave first arrivals from the waveforms recorded to seismic stations.
The following files are necessary in order to perform the moment tensor inversion, as shown in Figure 1:
- Using seed. Seed file from the Episode database, automatically uploaded once the seismic event is selected (see 2. bellow) - NOT IMPLEMENTED YET IN THIS WAY
- Using Seismic Event. Seismic event selected from the Episode catalog after applying successively "Actions", "Use in simple component" and "Event Chooser", as shown in figure 2.
- Using Velocity Model. Velocity model uploaded from the Geological data of the selected Episode.
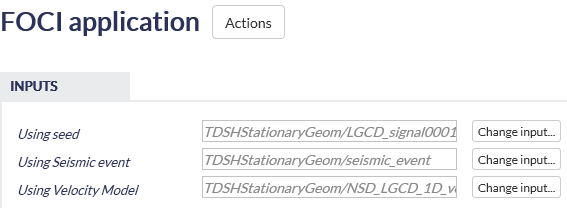
Figure 1.

Figure 2.
Once all these files are selected, a map appears on the screen showing the epicenter of the selected event (red circle) and the locations of the seismic stations nearby (green triangles), as demonstrated in figure 3. Information on the event and the stations appears on the screen, after clicking on the circle or the triangles, respectively. Moreover the waveforms are also shown in the screen and are available for elaboration. As depicted in figure 3, only the vertical channels are shown, since the methodology applied in this service uses only P-waves. Nevertheless, the User can make all the channels appear, by ticking the "E" and "N" components, next to the "Show channels" field.

Figure 3.
Waveform Processing
The options provided by the waveform viewer are described in Figure 4: When clicking on one waveform, additional options appear.

Figure 4.
- The user selects the component(s) that he/she wishes to be displayed in the screen. East-West, North-South, Vertical.
- Horizontal zooming in-out.
- Vertical zooming in-out.
- Undo zooming.
- Select between phase (start and end point) picking and single point picking.
- Only P-wave is enabled in this Application. (In other Applications, selection between P-wave and S-wave picking are possible).
- Undo picking.
- Horizontal zooming tool. The User may alternatively zoom in-out the waveform by clicking on this small vertical bar and move the mouse left-right.
- Collapse the details of the waveform.
- Move the selected (zoomed) part of the waveform left-right.
Picking Phase for Waveform Analysis:
The User has to pick a starting and an ending point from the Vertical component of a station (**Z channel - see Figure 5). Then, he/she has to repeat this picking for the other stations.
NOTE: Although it is not necessary to pick P-wave arrivals in all of the waveforms, a minimum of 8 picks is required for the service to proceed to the calculations (stated also at the bottom of Figure 5). The number of the seismograms and P-wave phases picked, are updated, each time the User selects makes a new picking.

Figure 5.
Parameters selected for the waveform inversion:
most of the additional parameters required to execute the service are briefly described in the screen (Figure 6).
Custom event depth [km]: The depth of the event is already taken from the catalog, however the User has here the chance to modify the given value, or retry the process with different depths.
Density [kg/m3]: The density of the medium is requested by the user.
Select Output data elements and their order: All options are described next to the boxes. The User may tick any of them he/she wishes, or select all of them by putting a tick in the green box of Figure 6.
Select Output solution types: All options are described next to the boxes. The User may tick any of them he/she wishes, or select all of them by putting a tick in the red box of Figure 6.
Advanced Options: (NOT YET IMPLEMENTED)

Overview
Content Tools
null![]()
EPISODES Platform is maintained by the TCS AH Consortium![]() . © 2023 IG PAS & ACC Cyfronet AGH
. © 2023 IG PAS & ACC Cyfronet AGH