Page History
| Anchor | ||||
|---|---|---|---|---|
|
| Info | ||
|---|---|---|
| ||
Applications within the EPISODES Platform are software tools to process and analyze the data. They help to relate seismicity and technological factors for hazard assessment and other scientific targets. Unlike the data provided by the Platform, the applications are executable tools - they can be run within the Platform. This is performed within the User's Workspace. By September 2021, 72 applications, grouped in 8 categories, are integrated in EPISODES Platform |
Navigating to Applications
To access the information about the available applications, click the 'Applications' tab in the portal main menu. This takes you to the view containing all available applications list along with short descriptions and options for selecting and filtering them. This view is described in detail in the next section. An alternative way, to learn about an application, is to start from creating it in workspace and navigate to its description from there - this is described in the last section of this page.
Note, that the list of available application is always available, whereas, using the applications (adding them to workspace and running) is available only to registered users.
| Anchor | ||||
|---|---|---|---|---|
|
In general, Applications within the EPISODES Platform are divided into several categories comprising tools for data handling, data processing, scientific analysis and visualization. Scientific analysis applications
In the present platform version the available Applications ("Applications" tag in the IS-EPOS main page) are grouped into the categories shown in Figure 1, each one containing several applications (click on each Applications for details):

Figure 1. Applications available in IS-EPOS Platform.
...
sustain advanced methodologies for AH data analysis, whereas
...
data handling and processing applications comprise tools for data transformation
...
, preparation, filtering, format conversion and basic data processing. More detailed category names provide insight on the general purpose of the applications inside each category. The current taxonomy of the available Applications, along with detailed user guides for each service is available in Application User Guides section of this documentation. Apart from categories, each application is described with several keywords characteristic to its functionality.
Name of the category and keywords might be used for filtering the available applications list (filtering by categories - Field 3, Figure 1 , filtering by keywords - Field 2, Figure 1 ). Full text search is also available to find a required application based on words that might have been used to describe it (Field 1, Figure 1). Information on each application is shown on the screen (short description, category and last update) and the user may upload the Application to the workspace to run it by clicking on the 'Add to Workspace' 1 tab (Field 4, Figure 1). By clicking at the name of each application you are taken to a view containing more detailed information about the chosen application (see the next section).
Anchor Fig1 Fig1

Figure 1. Applications list.
| Anchor | ||||
|---|---|---|---|---|
|
The detailed view of the application (Figure 2 contains a description of the method used for its implementation, description of its parameters and execution characteristics as well as other properties like author, licence (if the application code is available for download), references etc. Among the references, most applications provide links to their user guides, scientific articles related to them (Document Repository) and code repository (if the code is available for download).
This view also allows you to add the application to workspace ('Add to Workspace' button 1 ).Anchor Fig2 Fig2

Figure 2. Information on an example application and links to the corresponding references
| Anchor | ||||
|---|---|---|---|---|
|
Prerequisites: to be able to run applications, you will have to learn how to add data to workspace - for these, see the AH Episodes guide, you can also find helpful additional information about the workspace itself contained in the My Workspace guide.
The applications are in fact programs that are run on the computing infrastructure connected to IS-EPOS Platform. They have to be configured with input files, parameters before running, and they produce output files as result. Each application can be run a number of times with different parameters. The user might also have multiple copies of an application, in this way, allowing the user to compare results of running the same code with different parameters or input files. For the purpose of storage and configuration, the application has to be added to workspace 1 - this can be done either from the application list view or application details view (see previous sections), or by using some of the data already existing in your workspace (Figure 3.1) 2 .
See also Usage Scenario section for a full sequence of steps leading to running an application.Anchor Fig3.1 Fig3.1

Figure 3.1. Adding an application by using data existing in the workspace. Only applications compatible with the selected data file are available for selection.
A sample view of an application added to workspace is presented in Figure 3.2. If we added the application with the "Use in application..." menu (Figure 3.1), at least one of the input files is already filled. Otherwise, we have to select a file (using the button marked in red in Figure 3.2). Each input file entry has an information about the file type and number of required files. The selection is restricted only to files have the required type, therefore, you will not be able to choose any file that will be incompatible with this application. Below the input files, the application parameters are displayed.Anchor Fig3.2 Fig3.2

Figure 3.2. Sample view of an application added to workspace (before running it).
The application can run with the "Run" button. At this moment, both, the input files and parameters are validated, therefore, if you forgot to add any file or any of the parameters is specified incorrectly (e.g. is outside of the allowed range), you would be informed about it with messages displayed in red color. Once the application is run, its status changes (a detailed description of possible statuses is described in Table 3.1) and it can no longer be run again till the execution finishes. You can interrupt the execution by clicking the "Abort" button.Anchor Table3.1 Table3.1
| Status name | Description |
|---|---|
| New | The application has not been run yet |
| Submitting | The execution of application was delegated to computing resources outside of the environment EPISODES Platform usually uses for computation and we are waiting for the allocation of this resources. Note: this status will appear only for applications that require unusual amount of computational resources (e.g. have longer computation time, larger memory consumption, or require specific libraries) or for the custom applications created by users. |
| Queued | The execution of the application was scheduled by the system, but the system is still waiting for computational resources to be able to perform the computation. Depending on the type of the application and, sometimes, on the input files and parameters (such information should be provided with the application details - see the Application details section), this could take from, usually, a few seconds to several minutes or even hours (very rarely). |
| Running | The application was successfully allocated computing resources and is being executed. Depending on the type of the application and, sometimes, on the input files and parameters (such information should be provided with the application details - see the Application details section), this could take from, usually, a few seconds to even up to several hours. |
| Finished | The application completed successfully. |
| Finished with error | The application execution completed with errors, usually a message with the error will appear next to the status name. The error might mean that the some of the input data or input parameters that we could not verify at the time of validation are incorrect or incompatible with each other. In such case, correcting the input files or form values and running the application again could result in a successful run. If the error is not clear, you can contact the Platform's staff for assistance. |
| Aborted | Application execution has been stopped by the user. We cannot guarantee that the computation resources were freed by this time, but the system will treat the application as if it was stopped, it can be now run again. |
TODO: results
TODO: autorun
1 Note, that this option is available only to registered (and logged in) users. Some applications may also have access restrictions, that would require you to have a specific affiliation to access it. If the 'Add to Workspace' button is disabled, hover over it to see the reason.Anchor Footnote1 Footnote1
2 Observe, that this scenario provides an additional advantage, namely, the list of the available applications is restricted to only those, that are compatible with the selected input - i.e. that can be run using the selected file.Anchor Footnote2 Footnote2
- Collective properties of seismicity:
- Seismic Activity - Inter-event Time Distribution Analysis
- Source Size Distribution
- Completeness Magnitude Estimation
- Source Size Distribution Functions (Also found in the next category)
- Probabilistic Seismic Hazard Analysis - stationary
- Hazard Parameters Estimation
- Exceedance Probability
- Maximum Credible Magnitude
- Mean Return Period
- Source Effect
- Source Size Distribution Functions (Also found in the previous category)
- Hazard Parameters Estimation
- Probabilistic Seismic Hazard Analysis - time dependent
- Time Dependent Seismic Hazard Parameters
- Stationary inducing factor
- Time Dependent Seismic Hazard Parameters for Stationary Geometry
- Time Varying inducing factor
- Time Dependent Seismic Hazard Parameters for Time Varying Geometry
- Source Parameter Estimation
- Earthquake Spectra
- Spectral Analysis
- Source Location
- Localization (TRMLOC)
- Moment Tensor Inversion
- Moment Tensor Inversion (FOCI)
- Earthquake Spectra
- Stress Field Modeling
- Stress Inversion from Focal Mechanisms
- Fracture Network Models - Mechanical Stresses
- Technology - Seismicity Interaction
- Correlation Analysis
- Autocorrelation
- Coefficient of Randomness
- Cross Correlation
- Priestley-Subba Rao Test
- Correlation Analysis
Alternatively the user may browse an Episode, upload the data he/she wishes to use for analysis to the personal workspace, and then use these data for visualization, high level application or low level (Simple Component) application (see figures below).
Step 1:Browse Anthropogenic Hazard Episodes by clicking on "AH Episodes" and select a specific Episode from the list by clicking on one of the panels (e.g. the one indicated by the red box in Figure 2):

Figure 2. Episodes list on IS-EPOS Platform.
Step 2: Select a data type from the list (e.g. catalog in the example shown in Figure 3). There are several data types available with respect to the episode and the induced seismicity technology:

Figure 3. Data available for a particular episode.
Step 3: Once the User selects one data type he obtains access to data attributes, numerical values and visualization applications. For further data processing the User has to click on the 'Actions' tab and then on the 'ADD TO WORKSPACE' window which appear right below (red frame at the top of Figure 4):

Figure 4. Available actions to add a file to the user workspace.
Alternatively, the User may continue from step 2, through the following process:
Step 3b: After selecting an episode the user may receive access to all available data from any episode by clicking on the 'All data related to this episode' tab (red box, in the bottom left corner of Figure 5).

Figure 5. Alternative way to add a file to user workspace. 'All data related to this episode' function should be used.
Step 3c: A Data search screen is now displayed (See also 'Advanced Data Search' in 'AH Episodes' chapter). The User may either select one or more (even all) episodes, or apply a filter from the list provided such as time range, country, data type etc (Figure 6). All data after the filtering criteria application is now demonstrated and the User may select one or more data types for further processing. If the User chooses the "View File" tab, the same screen as in the previous step, appears. If the User clicks at the 'Add to Workspace' tab, the data is directly transferred to his/hers personal workspace (Figure 7). (See also AH Episodes chapter)
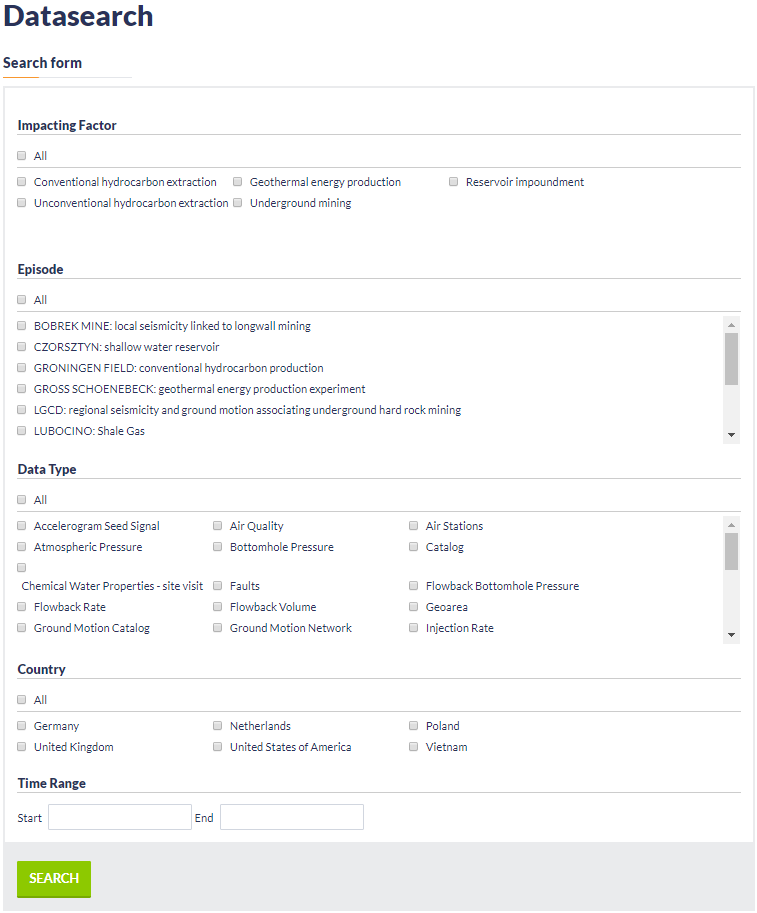 |  |
|---|---|
| Figure 6. Data search functionality. | Figure 7. Results of the data search. Option to add files to the user workspace is available from this level. |
Step 3d: Once the selected data is uploaded at the personal workspace, the User may click on the 'Actions' tab in order to use these data in one of the available applications, grouped into 3 categories: 'USE IN APPLICATION', 'USE IN VISUALIZATION', 'USE IN SIMPLE COMPONENT'. This is the Data Oriented Approach shown in Figure 8.

Figure 8. Possible applications that could be used by the user for a catalog file from Song Tranh episode.
Alternatively, an Application Oriented Approach can be followed as displayed in Figure 9. The User selects the Application first and then clicks on the 'Change input' tab for choosing (Shown in the red frame of Figure 9) the appropriate input data file(s).
Figure 9. Application oriented approach to prepare and load the file into the application.
...
Overview
Content Tools